Throughout this guide, I'll assume that you know what you're doing. Which is to say, you're proficient with your software, and have a fair grasp of your craft. This is not a step-by-step walkthrough on creating terrain textures, or applying them to your terrain, it's a technical guide on the ways you can take advantage of the Detailed Terrain technology in your work.
The guide is divided into two main sections. The first section will help content creators make the best use of the system by understanding how it works, and how to get the most effective results with the least effort. The second section covers techniques for creating landscape textures with the alpha information needed to support the Detailed Terrain technology.
General Modding
If you want to develop your mod with Detailed Terrain, you should start with an understanding of how the technology works. Just like the traditional shader, Detailed Terrain layers multiple tiling textures together onto the landscape in areas you paint down in your editor. Unlike the traditional system however, when you paint down a partially transparent area, the shader uses the texture's alpha channel to mask the results, producing a textured transition.
This effect is ramped, so that when the layer opacity is 50% the texture's alpha channel fully masks the texture. As the layer opacity increases, the alpha effect is decreased, until even completely transparent areas of the texture become opaque. As the layer opacity decreases, the alpha effect is increased, until the textures comes completely transparent. You can get a sense of this by using the simulation below.
50%
Working With Layer Order
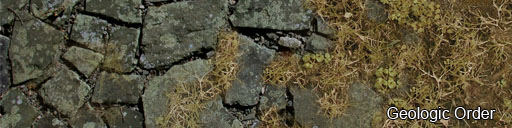
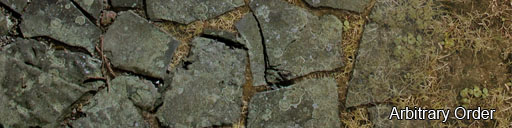
In Detailed Terrain, the order of your texture layers matters. Since each texture is masked by its own alpha channel, the effect only applies to how it blends with the textures below it, making the way it overlaps or underlaps other layers obvious to the user. To get the best effect you'll want to plan your layer order ahead of time, and stick to it.
Probably the simplest way of working out your texture order is by thinking of the landscape in geological terms - grass over rocks, rocks over dirt, dirt over bedrock, and so forth. This will help make sure that when you overlap your own landscape layers they make sense visually. Consider the two following examples, one in geologic order, the other ordered arbitrarily.
Selecting Complementary Textures
Since this system creates sharper transitions between landscape textures, it's especially important that you make smart decisions about which textures to layer together. The greater detail can reveal some bad combinations that just got smeared together in the old fashioned shader system. There are two important concerns to keep in mind: levels, and pattern.
As you can see in the examples below, it's important that you choose to layer textures that go well together. While the idea of this technology is to create crisp transitions, too much contrast between layered textures will never look natural. If you're creating your own textures, you can easily control this, but even when using existing materials it's important to pay attention to.

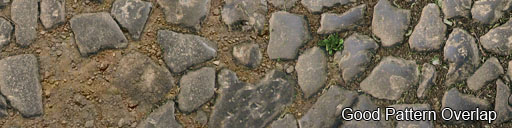
Textures based on the same source almost always work well together. Differences in alpha and color can be used to produce a nice effect and break up tiling in large areas of exposed landscape. You will also get good results overlapping textures that don't use detailed patterns, as you can see in the examples of layer order above.
Texture Creation
If you can create your own traditional landscape textures, you shouldn't have any trouble creating textures that are set up for Detailed Terrain. How much time it takes to prep your textures will vary, but you should realize up front that this will take some actual work and artistry. It's not an automatic process that you can apply blindly, it's a part of your texture creation process just like painting the diffuse or creating the normal map.
Broadly speaking, all you need to do to your landscape textures to support Detailed Terrain is add an alpha channel. It's the way you paint that alpha channel however that will make or break the effect. As described in the previous sections, your texture's alpha channel will be used to mask your texture, and so it's important that the pattern in the alpha channel relate well to the elements in the base texture.
Side Note: Backwards Compatibility
One common concern in supporting technology like this is that it might require different assets for users who use your mod but don't use the tech. One of the advantages of Detailed Terrain however is that this isn't the case at all. The traditional shader totally ignores the extra information you'll include in your Detailed Terrain enabled landscape textures, so you can simply distribute the enabled textures to everyone.
Common Considerations
While each texture you make will require individual attention, there are a few things that will always be relevant to your Detailed Terrain alpha channels. The most straight forward of these considerations is tiling. Just as with the normal color channels of your texture, the alpha channel will be tiled across the terrain, and for those same reasons, it's important that your alpha channel tiles seamlessly with itself. You should already know how to accomplish this.
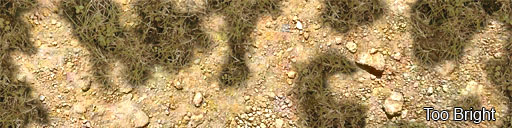
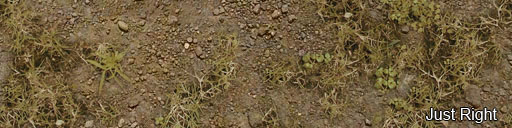
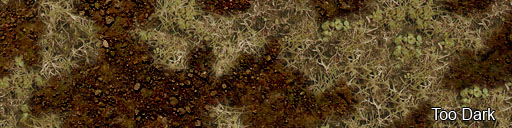
Less obvious, but equally important to every Detailed Terrain texture is the subject of contrast. The Detailed Terrain shader uses a full range of gray scale values, but the most dramatic effects are produced when your alpha channel contains high contrast. While a little blur or gradient will help your texture blend nicely with the layers below it, it is also important to keep contrast in general high, to produce distinct edges. This is discussed in more detail bellow.
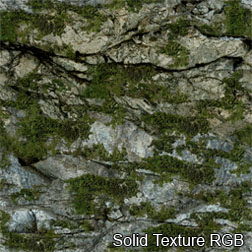
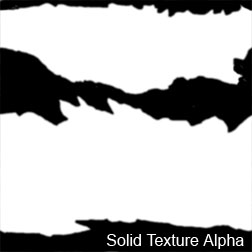
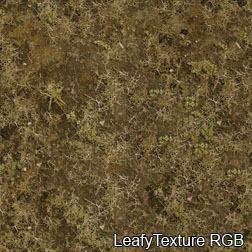
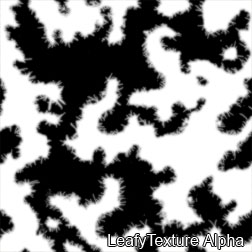
Analyzing The Source Texture
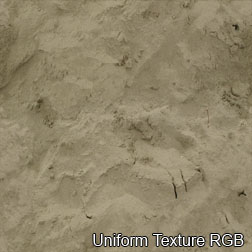
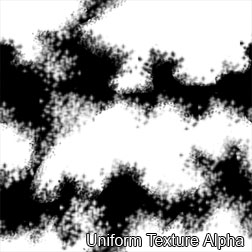
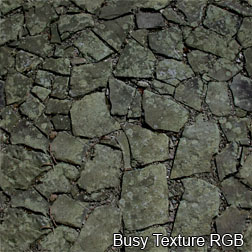
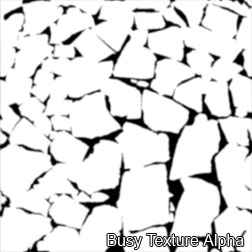
What will go into a given texture's alpha channel will vary. Some textures only call for a simple mask with broad areas cut out of it, while others demand a more detailed approach for ideal results. In general, landscape textures fall into one of four broad categories, and by examining your texture you can gain some insight into what kind of alpha channel you would do best to create for the texture in question.
A Last Word On Textures
While the instructions above don't exactly hold your hand on the subject of texture creation for Detailed Terrain, they should help you get started and get on the right track. Look to the textures that come with the mod for more (and higher resolution) examples, and develop a work flow that works for you as an artist. When you settle in to the technique, you'll find that you can work some real magic with the technology.